


It's the first day of spring and I have a surprise for ya'll! I can release my picture tutorial and free pattern for The Happy Blossom Granny Square! So without further adieu, here it is!
Scroll down to view the picture tutorial for free. And for the written pattern without pictures, scroll to the bottom of the tutorial.
The Happy Blossom Granny Square Tutorial

Supplies:
-Yarn
-Crochet hook
-Scissors
-Darning needle
Abbreviations:
Single crochet: SC
Double crochet: DC
How To's:
Chain: Yarn over and pull through.
Slip Stitch: Insert the hook into the stitch, yarn over and pull the hook through the stitch and the loop on the hook.
Single crochet: Insert the hook into the stitch, yarn over and pull through the stitch. You should have 2 loops on the hook. Yarn over and pull through the two loops.
Double crochet: Yarn over, insert the hook into the stitch, yarn over and pull through the stitch. You should have 3 loops on the hook. Yarn over and pull through 2 loops. You should now have 2 loops on the hook. Yarn over and pull through the 2 loops.
Let’s get started!
Round 1:
Step 1: Make a slip knot by taking the yarn and forming a loop. Take the loop and flip it, and then take the hook and scoop up the line of yarn going through the center of the loop. Pinch together the two dangling yarns and pull loosely.


Step 2: Chain 6

Step 3: Slip stitch in the slip knot to form a ring.

Round 2:
Step 1: Chain 1
Step 2: Put 1 SC into the ring.


Step 3: Put 15 more SC into the ring. You will have to slide the single crochets around to make room as you go.
Step 4: Slip stitch to the first single crochet with the new color by putting the hook through the stitch, yarn over with the new yarn and pull through the stitch and the loop on the hook. This is a slip stitch color change.


Round 3:
Step 1: chain 4
Step 2: DC in the same stitch, SC in the next stitch.


Step 3: *In the next stitch, DC, then chain 1, then DC. SC in the next stitch.*


Step 4: Repeat the directions between the *s in step 3 all the way around.
(6 more times)

Step 5: Slip stitch with the chain with the new color. (Count up 2 from the bottom of the chain 4.)


Round 4:
Step 1: *Chain 3, SC in the next SC, chain 4, and SC in the same stitch.*


Step 2: Repeat the directions between the *’s in step 1, all the way around ending with the SC in the same stitch, no chain 3 at the end. (7 more times, but the 7th time has no chain 3 at the end.)

Step 3: Slip stitch with the first chain with the new color.

Round 5:
Step 1: Chain 2 and then slip stitch into the next leaf.

Step 2: *Chain 1 and then put 2 DC, chain 2, 2 DC into the chain 3 space. Slip stitch to the next leaf, chain 2, and then slip stitch to the next leaf*


Step 3: Repeat the directions between the *’s in step 2. (2 more times)
Step 4: Chain 1 and then put 2 DC, chain 2, 2 DC into the chain 3 space. Slip stitch to the next leaf.

Step 5: If this is the last round: Chain 1 and slip stitch to the first chain. Cut the yarn and weave in the ends.

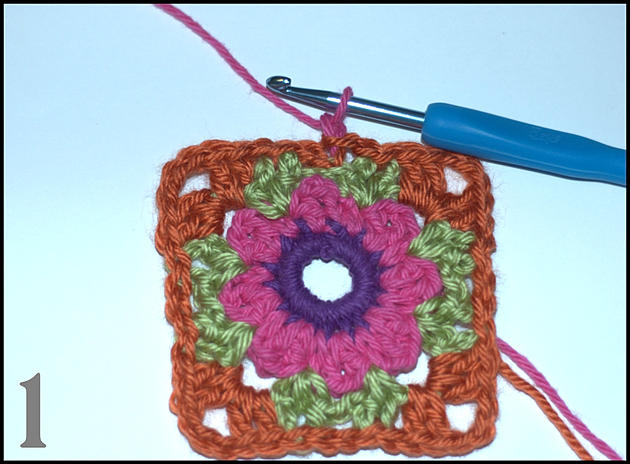
This is the 5 round Happy Blossom Granny Square.

If this is not the last round: Chain 1 and slip stitch the new color to the first chain.

Optional border 1:
Round 6:
Step 1: Chain 1 and then in the back loops only: SC in each stitch across 5 times.


Step 2: Put a SC, chain 2, and another SC into the corner space.

Step 3: *In the back loops only, SC across 9 times. Then in the corner space put a SC chain 2 and another SC.*
Step 4: Repeat the directions between the *s in step 3. (2 times)
Step 5: Single crochet in the back loops only across 4 times.
Step 6: If this is the last round: Slip stitch to the first single crochet. Cut yarn and weave in the ends.
This is what the 6 round Happy Blossom Granny Square looks like.

If this is not the last round: Slip stitch to the chain with the new color.
Optional Border 2:
Round 7:
Step 1: Chain 1 and in both loops again, SC across 6 times.
Step 2: Put a SC chain 2 and SC into the corner space.
Step 3: *SC across 11 times. And then put a SC chain 2 and a SC into the corner space.*
Step 4: Repeat the directions between the *s in step 3. (2 times)
Step 5: SC across 5 times and then slip stitch to the first single crochet.
Step 6: Cut yarn and weave in the ends.
This is what the 7 round Happy Blossom Granny Square looks like.

Now you have completed the Happy Blossom Granny Square, Congratulations!
I really hope this tutorial is helpful.
The written pattern without pictures:
Abbreviations:
Single crochet: SC
Double crochet: DC
Let's get started!
Round 1: Make a slip knot and chain 6. Slip stitch to the slip knot to form a ring.
Round 2: Chain 1 and put 16 SC into the ring. (You will have to slide the single crochets around to make room as you go.) Slip stitch to the first SC from this round with the new color.
Round 3: Chain 4. DC in the same stitch, SC in the next stitch. *In the next stitch, DC, then chain 1, then DC. SC in the next stitch. * Repeat the directions between the *s in step 3 all the way around. (6 more times) Slip stitch to the chain with the new color. (Count up 2 from the bottom of the chain 4.)
Round 4: *Chain 3, SC in the next SC, chain 4, and SC in the same stitch.* Repeat the directions between the *’s, all the way around ending with the SC in the same stitch, no chain 3 at the end. (7 more times, but the 7th time has no chain 3 at the end.) Slip stitch with the first chain with the new color.
Round 5: Chain 2 and then slip stitch into the next leaf. *Chain 1 and then put 2 DC, chain 2, 2 DC into the chain 3 space. Slip stitch to the next leaf, chain 2, and then slip stitch to the next leaf* Repeat the directions between the *’s. (2 more times) Chain 1 and then put 2 DC, chain 2, 2 DC into the chain 3 space. Slip stitch to the next leaf. If this is the last round: Chain 1 and slip stitch to the first chain. Cut the yarn and weave in the ends. If this is not the last round: Chain 1 and slip stitch the new color to the first chain.
Optional border 1:
Round 6: Chain 1 and then in the back loops only: SC in each stitch across 5 times. Put a SC, chain 2, and another SC into the corner space. *In the back loops only, SC across 9 times. Then in the corner space put a SC chain 2 and another SC.* Repeat the directions between the *s in step 3. (2 times) Single crochet in the back loops only across 4 times. If this is the last round: Slip stitch to the first single crochet. Cut yarn and weave in the ends. If this is not the last round: Slip stitch to the chain with the new color.
Optional Border 2:
Round 7: Chain 1 and in both loops again, SC across 6 times. Put a SC chain 2 and SC into the corner space. *SC across 11 times. And then put a SC chain 2 and a SC into the corner space.* Repeat the directions between the *s. (2 times) SC across 5 times and then slip stitch to the first single crochet. Cut the yarn and weave in the ends.
Copyright ©2015 Alexandra Halsey
You may sell any finished items, but I do request that you put a link back to my pattern and credit Alexandra Halsey for the original design under the Creative Commons Attribution Share Alike license. Do not copy, share, download or publicly display this pattern without permission.
Soft hugs <3
